How to Take Screenshots with PowerPoint (2026)
Last updated on December 21st, 2025

For many people, taking screenshots may seem like an easy, straightforward thing. You just capture what’s on your screen and you’re done. For those who have to take screenshots off their screens, specifically of their PowerPoint presentations on a daily basis, this can be so much more complex using third-party apps.
However, what you may not know is that PowerPoint already has a screenshot tool so that you don’t have to download another app. Here is a quick guide on how to take screenshots with PowerPoint.
Microsoft Office understands how many would need to capture their screens while they’re working on their Office apps, such as PowerPoint. Therefore, they have created a screenshot tool that allows you to capture not just the screen, but also, in fact, your presentation in video form.
How to take a screenshot on Windows? Let’s see different ways to accomplish this task and be more productive at work. We will see how to take a screenshot on Windows, and then how to record your screen (screen recording). Both options will let you to use either the images or the captured screen recording in your presentations.
Screen Capture in PowerPoint — The easiest way
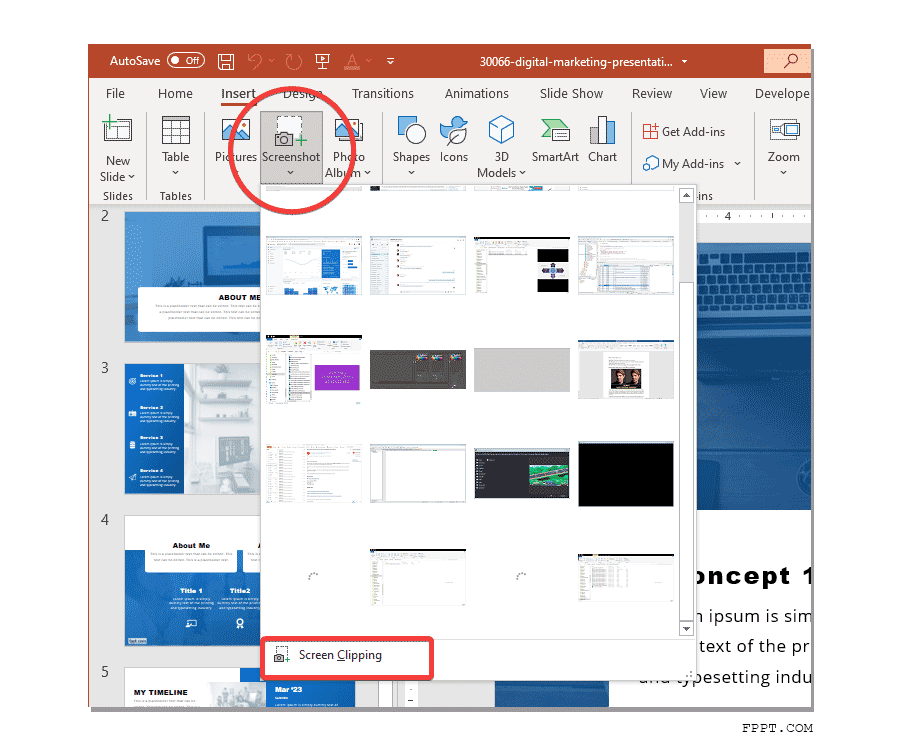
By using the Screenshot feature in PowerPoint, you can take screenshots and save a computer screen image into your slides. So, how to make a screencast with powerpoint using Screen Capture? The screenshot functionality is available under the Insert menu, in the PowerPoint Ribbon. When you click this option, a popup will appear showing the current Windows in your computer. You may choose to grab a screenshot from an existing Window, or use the Screen Clipping option instead to select an area.
- Take a screenshot in PowerPoint of any Window opened in your system. This option will be the easiest way to grab a screenshot from the current opened Windows.
- Use Screen Clipping tool to select a custom area in your screen. This option will let you define an area or region in your screen and PowerPoint will take a screenshot only of the portion of the screen you have selected.
The following screenshot shows where the Screenshot functionality is available in Microsoft PowerPoint interface. Let’s see how to screenshot on Windows with the help of Microsoft PowerPoint’s Screenshot tool.
How do you take a screenshot on a computer if you don’t have PowerPoint?
There are several screenshot tools that you can use to take a screenshot on a computer, even if you don’t use PowerPoint. Some of these tools are reviewed in our other article about Screenshots.
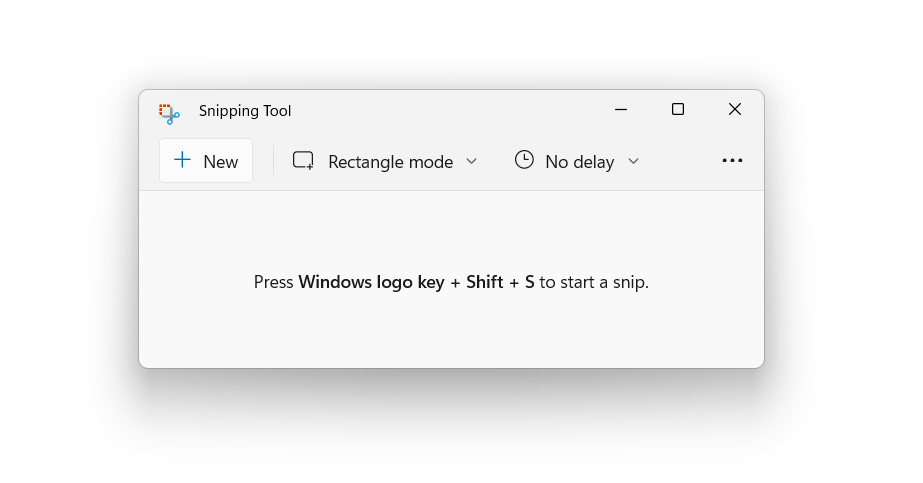
- Snipping Tool – If you are on Windows, you can use the
- ShareX – It is an open source tool that will let you take screenshots on your computer. It is very flexible and allow you to do a lot of things with your screnshots with the customizable options. There are many other alternatives to ShareX available.
- Greenshot – Greenshot is a free and open-source program for taking screenshots. It is also light-weight screenshot software tool for Windows with many features.
Capture Your Screen with PowerPoint
The Screen Recording tool is a helpful feature in PowerPoint that allows you to capture whatever is in your screen as you work with PowerPoint.

How to capture the screen on Windows using PowerPoint and save it as a recording? To capture your screen in PowerPoint, just click the Insert tab in the Ribbon. Then, under Images, click on the Capture option. This action will display a drop-down and this will show the windows opened on the desktop, so you can select which you want to take a screenshot of. To finish taking a screenshot in Windows using PowerPoint, you can also select the Screen crop option at the bottom.
Just click and drag the mouse pointer over any area on the screen that you want to capture. Then, PowerPoint will automatically show the captured screenshot in the presentation. You can save the image to your computer by clicking on the image and selecting Save as Image.
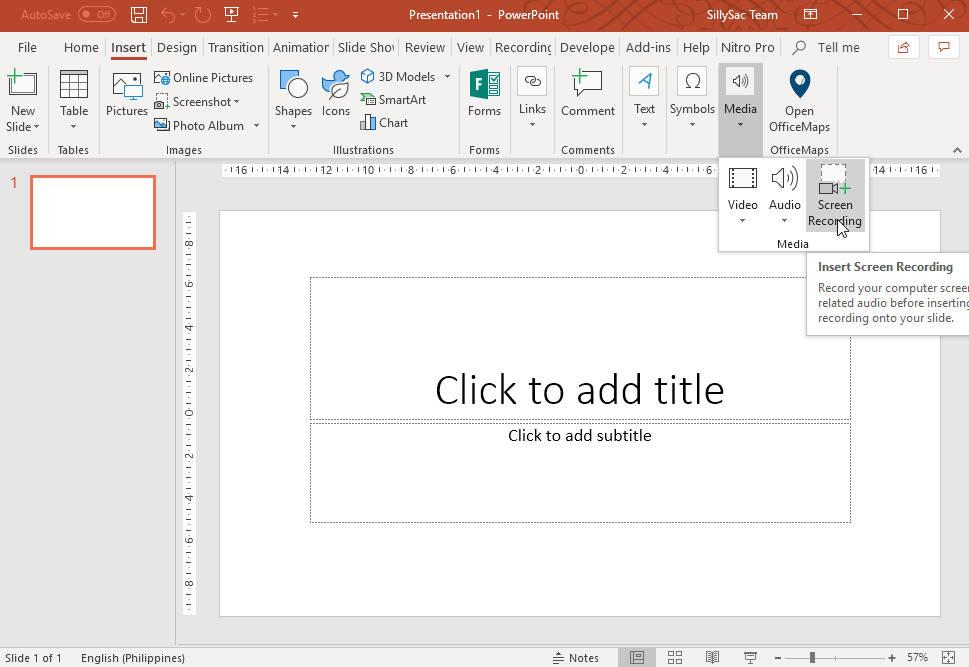
How to Record Your Screen in PowerPoint
To record your screen as you use PowerPoint, you first have to open the Office tool. Go to the Insert tab in the Ribbon. Within this, select the Multimedia section and then choose Screen Recording.
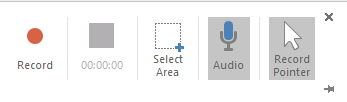
Once you click on this tool a small window will automatically open, showing you different control buttons for recording the screen. In this control window, you will see the button for starting the recording. Then there’s a space that displays the amount of time you have recorded. There’s also a selection button so you can choose any area on the screen that you want to record, as well as adding audio or not as you record. Furthermore, you can also choose to include the mouse pointer to the recording.
Once you have selected your preferred settings, you can then start recording. You can just press the red button again if you want to stop. Once you’re done, you can then embed the video clip to your PowerPoint presentation. No need to convert or use another software. Just save the video to your computer by clicking on Save As -> Multimedia. This will give your video an mp4 format for use in presentations and other applications.
The aforementioned features can help you in making presentations involving tutorials and tips. You can also use these techniques to take screenshots on Windows or record your screen using PowerPoint for teaching and training presentations, with many applications in different industries and even in the education setting.