How To Record a PowerPoint Presentation in 2026
Last updated on January 6th, 2026
The art of communication has transcended traditional boundaries, paving the way for innovative methods to share knowledge and ideas. Among these, recorded presentations have emerged as a powerful tool for online events, webinars but also for offline conferences, kiosks, and more, allowing for information to be disseminated widely and efficiently.
This article delves into the essence of recording presentations in PowerPoint, while also highlighting why they are essential and how anyone can create one.
The Benefits of Recorded Presentations
There are plenty of advantages of using recorded presentations. You can use your favorite presentation tool to design and present your information to an audience, while some specific tools allow you to record the presentations and save them in different formats or stream them online. This is not only limited to PowerPoint, but also Canva presentations and Google Slides.
Here are some of the advantages of using recorded presentations for business and education purposes:
Accessibility: Recorded presentations break down geographical and physical barriers, making your content accessible to a global audience, including those with disabilities. They enable viewers to engage with your material at their own pace and on their own schedule.
Reusability and Consistency: Once a presentation is recorded, it can serve multiple audiences without the need for the presenter to deliver it live each time. You can also stream the recorded presentation online multiple times, without the need of spending presenter’s time. This not only saves time but also ensures that the message remains consistent, regardless of the number of viewers or the time they choose to view it.
Efficiency: In a world where time is precious, recorded presentations offer an efficient solution to communicate with various stakeholders at the same time. They eliminate the need for live sessions, thereby saving resources and allowing for the content to be consumed as needed.
Applications of Recorded Presentations
From educational courses to corporate marketing, recorded presentations find their utility in numerous domains.
Recorded presentations are particularly beneficial in online education, enabling the creation of engaging and interactive courses.
In the corporate world, recorded presentations serve as an effective tool for marketing, training, and communication, ensuring that key messages are delivered uniformly across the board.
With the advances of artificial intelligences, some tools have emerged to customize your recorded presentations, for example to include placeholders that you can substitute with your customer information or specific messages. Imagine recording a generic presentation where you can add placeholders, and then customize each recorded presentation at scale. Record once, and present N different times!
Preparing to Record Your Presentation
A successful recorded presentation begins long before the record button is pressed in PowerPoint. It involves careful planning of content, ensuring it is engaging and tailored for viewing rather than live delivery.
Additionally, attention must be paid to technical setup, including the selection of appropriate recording equipment and the design of visually appealing slides.
If you are using PowerPoint, you will find the Record tab in the PowerPoint Ribbon. This tab includes many different options to record your presentation, and configure the Cameo camera, in case you want to record a video of yourself in PowerPoint.
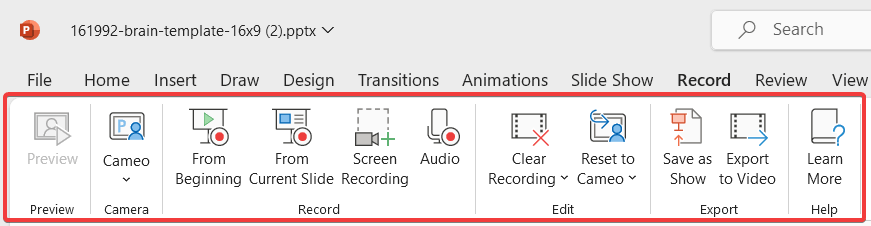
From the Record menu, you can also configure the Audio options, record a Screen or save the slideshow as a Show (.ppts). You can also Export to video or just clear all the recording settings and start again.
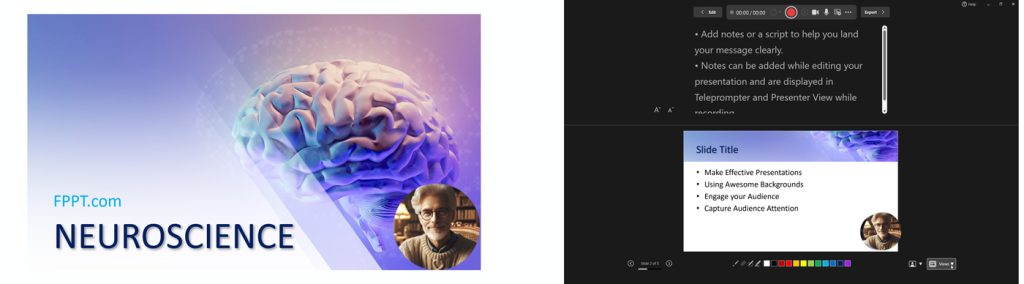
When you click on record button From Beginning, you will see your presentation and options to start the recording. The image below shows an example of these two screens if you have two monitors. If you have two monitors, one will show the presenter view, while the other will show the current slide.
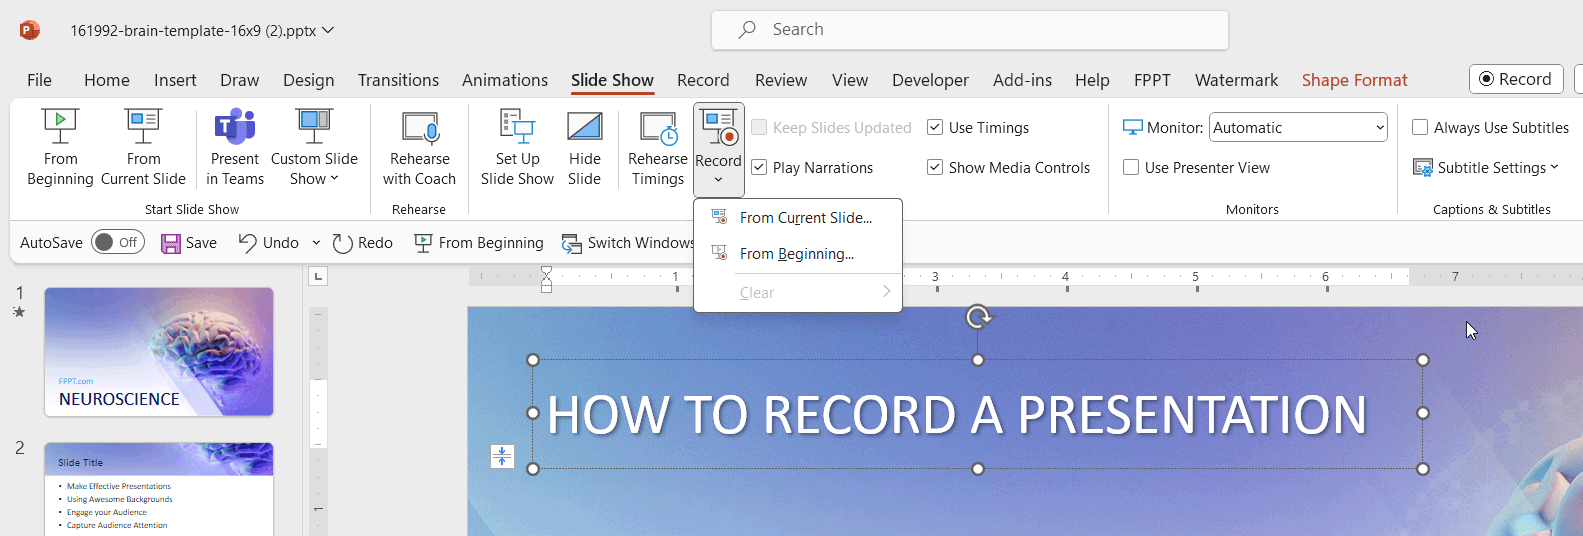
The Slide Show menu in the PowerPoint Ribbon is also a powerful place where to start your recording. This menu will also show several options to configure how you want to record your presentation, if from the beginning or from the current slide, and if you want to consider the animation timing, narrations and laser pointers or not.
Later, if you want to clear or start over, you can click on Clear menu and this will let you clear all recorded timings from the current slide or on all slides. You can also clear the narrations and laser pointer.
How to Record a Presentation in PowerPoint
PowerPoint offers a built-in functionality that simplifies the recording process, allowing presenters to record narration and on-screen movements with ease. Here’s how to do it:
- Prepare Your Slides: Ensure your slides are visually appealing and free from clutter. Use high-contrast colors and large fonts to improve readability.
- Set Up Your Equipment: Use a quality microphone and position it properly to ensure clear audio. If you’re including video, ensure your lighting is flattering and not too harsh.
- Start Recording: In PowerPoint, navigate to the “Slide Show” tab and select “Record Slide Show”. You can choose to start recording from the beginning or from a specific slide.
- Record Your Presentation: As you record, speak clearly and pace yourself. You can pause and resume recording as needed. Use annotations and pointer tools to highlight key points and text in your presentation.
- Edit and Enhance: After recording, you may edit the recording to trim mistakes or add enhancements like transitions or additional audio.
After the Recording
Once your presentation is recorded, PowerPoint allows you to export it as a video file, making it easy to share across platforms. Consider the best channels for your audience, whether it’s via email, on social media, or through a Learning Management System.
Conclusion
Recorded presentations can serve as a valuable tool for presenters who need to optimize their time and be more efficient. They offer a versatile, efficient, and accessible means to share knowledge, making them an invaluable asset for educators, professionals, and content creators alike. By leveraging tools like PowerPoint, anyone can create a recorded presentation that resonates with their audience.
Embrace the power of recorded presentations to enhance your communication strategy and connect with your audience in a meaningful way.