How to Compress Images in PowerPoint to Reduce Presentation File Size

One may often require reducing the file size of a PowerPoint presentation before emailing it or to ensure that there are no lags or hangs caused due to a heavy presentation file. in fact, if your file size is too heavy, the presentation might even crash, which can lead to a lot of embarrassment.
Compress Pictures in PowerPoint to Reduce File Size
One of the biggest culprits for a heavy presentation file size are images. Even photos imported from a camera roll can be worth 1-2 MB, which as you can imagine, impacts the overall presentation file size.
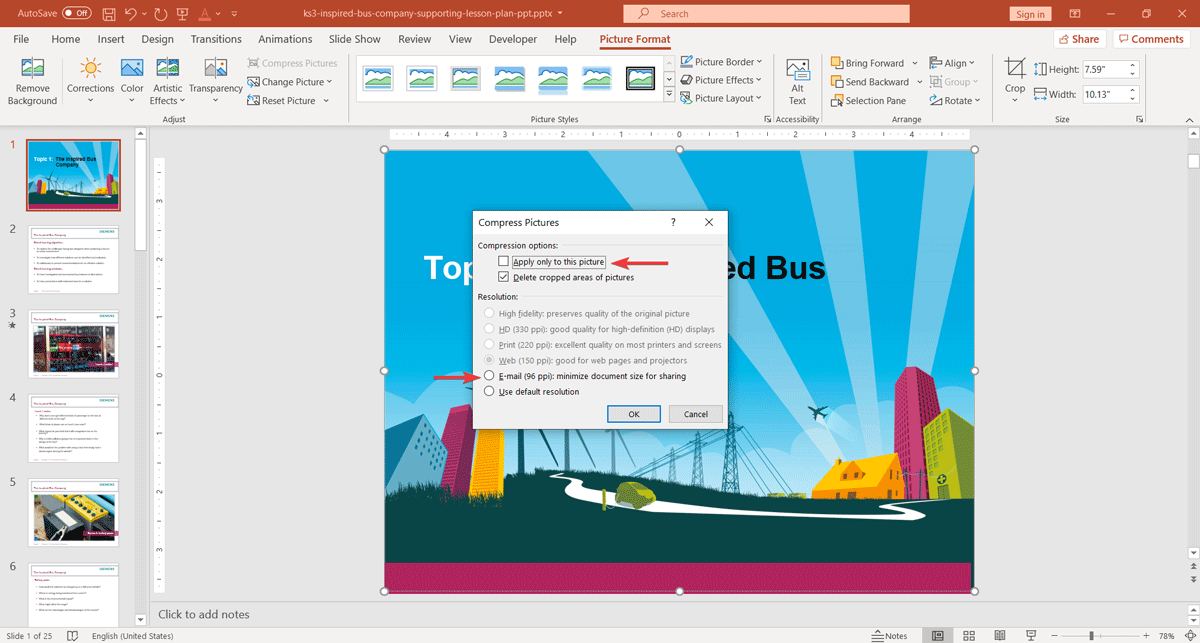
To reduce your image file size you can compress images in PowerPoint. To compress an image in PowerPoint, or all the images within a presentation, click on the image and then go to Picture Format and select Compress Pictures option which is present in the Adjust section.
A dialog box as the following will appear:

In this Dialog box you will be prompted to choose different compression options. Here you have some possibilities:
- Apply only to this picture: If checked, any change you made here will be applied only to the selected picture. However, having this option unchecked will apply the compression for all the images, so if you want to reduce the overall presentation and compress all the images in your PowerPoint presentation, you may consider to uncheck this option.
- Delete cropped areas of pictures: This will remove the areas of the pictures that are not visible in the presentation, and hence save file size.
- Set the resolution used for images: This option will ensure that the images are saved with certain resolution.
How to compress pictures in PowerPoint to its minimum size
Once you open the Compress Pictures dialog box in PowerPoint, do the following:
Check the option Delete cropped areas of pictures. This will crop areas that are not visible in pictures and reduce the overall presentation file size.
Uncheck the Apply only to this picture option so when saving all the images will be compressed, not only the selected one.
You can also set the maximum resolution which will define the output file size. If you want to keep the file size at its minimum size, then select ‘Email (96 ppi)’ option. This will minimize the document size for sharing. However, please be aware that selecting this option will compress the images to a point where it the quality could be compromised. You may review your entire presentation to ensure the image quality looks good after choosing this option.
A note from the editor: it could be better to choose Web resolution, which will compress the image in PowerPoint but not so much, so the quality is not drastically compromised.
Needless to say, click ‘OK’ to apply the configuration. This method is applicable for recent versions of PowerPoint and Microsoft Office 365.
Other than compressing images it is advised to carefully use videos, audio clips and animations to your presentations, as all these can impact the overall file size and lead to various issues when sharing the file or during presentation.
Alternatively, there are plenty of other tools that will help to reduce the image size, or you can use a free image resize tool online (see review here).
