How to Distribute Horizontally and Vertically in PowerPoint
Microsoft PowerPoint is a potent tool for creating not just engaging presentations, but also for producing compelling infographics and design materials. Infographics are a powerful way of presenting complex information or data in an easy-to-understand, visually appealing manner. In PowerPoint, the feature that allows users to distribute objects and text horizontally and vertically plays a pivotal role in creating such infographics. This article aims to elucidate how you can utilize this feature effectively, especially in creating infographics in a portrait slide format. In PowerPoint, you can distribute your objects and shapes horizontally or vertically and in this article we will see ways to accomplish it.
What Does it Mean to Distribute Objects and Text?
Before we dive into the how-to, let’s understand the concept of the distribution of objects in PowerPoint.
PowerPoint allows you to add and manipulate various objects, including shapes, text boxes, images, and more. Distributing objects means spacing them evenly, horizontally, or vertically across the slide.
It’s an essential tool for maintaining consistent and professional-looking layouts, particularly important when designing infographics where clarity and readability matter significantly, but also any business presentation (like company profile presentations or marketing presentations) in which you need to generate perfect-pixel presentations with text and objects aligned.
How to Distribute Objects Vertically and Horizontally in PowerPoint?
This feature is under the Format -> Align menu and is handy for automatically distributing objects in your slides. Instead of manually moving your objects or shapes to the desired placement, you can easily align the objects and distribute them to keep the same spacing between objects and shapes. Distribute shapes can also be applied to text objects which are very helpful in distributing paragraphs and other text labels used in your slides. For example, we have used this feature to distribute the textboxes in the Value Chain diagram that you can download from Michael Porter’s article.
Let’s see how the distribute objects work in PowerPoint.
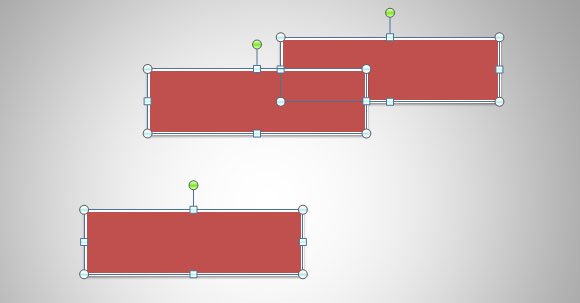
If we have the following shapes placed in the slide, we may want to distribute them vertically to keep the same spacing between the shapes.
First, select the objects and shapes you want to distribute and then go to Drawing Tools -> Format -> Align button.
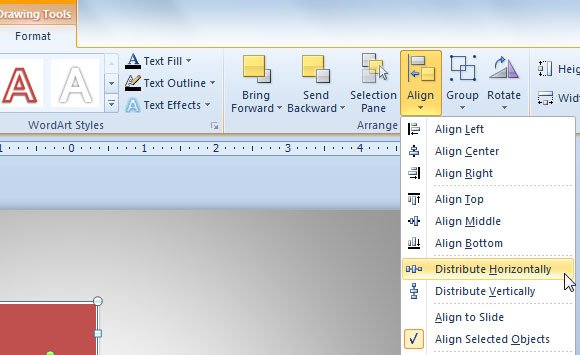
As soon as you click on Distribute Horizontally you will see the following results.
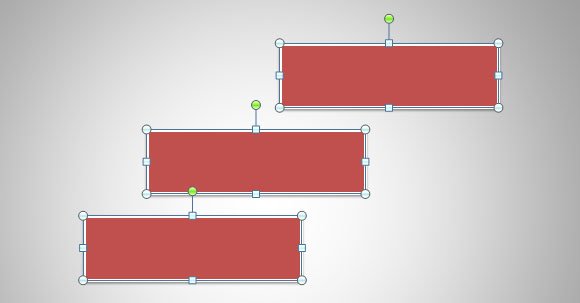
This is exactly how horizontal distribution works.
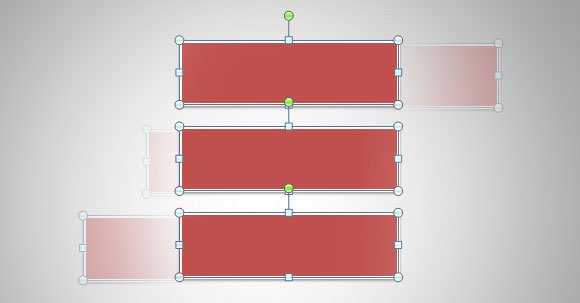
However, you can do more with these features and align the shapes accordingly. For example, if we want to keep the shapes aligned to the center, we may click on Align Center option and here you have the results.
In addition to other nice features of PowerPoint (for example the shape set operations and background removal tool) distributing objects in the slide can be really helpful to make your PowerPoint templates and presentations more attractive and its objects and graphics well aligned.
Step by Step & Quick Guide on How to Distribute Objects and Text Horizontally and Vertically
Distributing objects and text in PowerPoint is relatively straightforward. Here are the steps you need to follow:
- Select the Objects: First, you need to select the objects you want to distribute. Click on one object, then hold down the ‘Ctrl’ key (or ‘Command’ key on Mac) and click on the additional objects you wish to include.
- Access the Align Menu: Once your objects are selected, go to the ‘Format’ tab on the Ribbon, then click on the ‘Align’ button. If you’ve selected a shape, go to ‘Shape Format’ > ‘Align’; for text boxes or images, go to ‘Picture Format’ > ‘Align’. The ‘Align’ button opens up a dropdown menu with several alignment options.
- Choose the Distribution Option: From the dropdown menu, you have two distribution options: ‘Distribute Horizontally’ and ‘Distribute Vertically’. ‘Distribute Horizontally’ spaces the objects evenly from left to right, while ‘Distribute Vertically’ spaces them evenly from top to bottom to distribute vertically in PowerPoint.
- Apply the Distribution: Click on the appropriate distribution option, and PowerPoint will automatically distribute the objects evenly across the slide.
Creating Infographics in PowerPoint: Use Cases for Vertical and Horizontal Distribution
When creating infographics in PowerPoint, especially in a portrait slide format, distributing objects and text becomes particularly useful. Here are a few scenarios:
Vertical Timeline Infographic: Imagine you’re creating a vertical timeline to showcase the history of a company. You have the dates and corresponding events as text boxes. You can distribute these text boxes vertically to ensure even spacing, making your timeline neat and easy to follow.
Flowchart: In a flowchart, objects representing each step should be evenly spaced for better readability. By using the distribute horizontally or vertically feature, you can ensure each step is clearly distinguishable and your flowchart doesn’t look cluttered.
Comparison Infographic: When comparing products, services, or any data sets side-by-side, the distribute horizontally feature can be handy. By ensuring even spacing between different columns or sections, you can make the comparison straightforward and visually appealing.
Bar or Column Graphs: If you’re creating bar or column graphs manually, using the distribute feature ensures equal intervals between your bars or columns, lending your graph a professional look.
In conclusion, mastering the ability to distribute objects and text horizontally and vertically in PowerPoint is a critical step in designing effective and visually striking infographics. This feature allows you to manage your slide space efficiently, ensuring your infographics are as clear and impactful as possible. So, the next time you’re crafting an infographic in PowerPoint, don’t forget to use the distribution options to your advantage.
Pro Tips for Distribution in PowerPoint
As you continue exploring the potential of the distribution feature in PowerPoint, consider these pro tips to further improve your infographic design:
- Align First, Then Distribute: Before you distribute objects, align them first. PowerPoint offers several alignment options such as ‘Align Left’, ‘Align Center’, ‘Align Right’, ‘Align Top’, ‘Align Middle’, and ‘Align Bottom’. Proper alignment can make your infographic look cleaner and more professional. Once you’ve aligned the objects, you can then distribute them evenly.
- Use Gridlines and Guides: Gridlines and guides can help ensure that you’re positioning and distributing your objects accurately. To turn them on, go to the ‘View’ tab and check ‘Gridlines’ and ‘Guides’.
- Group Objects: If you want to keep certain objects together when distributing, consider grouping them. To do this, select the objects you want to group, right-click, and choose ‘Group’ > ‘Group’. The grouped objects will then act as a single object when distributing.
- SmartArt for Quick Infographics: PowerPoint’s SmartArt feature allows you to quickly create professional-looking infographics. Though this does not replace the fine-tuning you can do with manual distribution, it can be a time-saver for simple infographic needs.
- Slide Size Matters: Keep in mind that the distribute feature works within the boundaries of your slide. If you’re working on a portrait slide format, you’ll have more vertical space to work with, and distribution will adapt accordingly. To change your slide size, go to ‘Design’ > ‘Slide Size’ and select your preferred size.
Learning to distribute objects and text horizontally and vertically is a crucial skill for anyone looking to create compelling infographics in PowerPoint. By following the steps outlined above and applying these professional tips, you’ll be well on your way to mastering this key aspect of PowerPoint design.