How to Create PowerPoint Slides Handouts
Last updated on December 3rd, 2024

Handouts can be a valuable resource for both presenters and audiences alike, providing a tangible reference during or after a presentation. Whether you want to offer a physical copy of your slides for review, encourage note-taking, or simply ensure your key points are remembered, handouts allow you to customize the layout and format of your slides in a way that best suits your needs.
In this article, we will explore how to create and customize handouts in PowerPoint, from adjusting the slide layout and adding speaker notes to designing a polished, branded handout for your audience. Whether you’re looking to save paper or create a professional takeaway, this guide will show you how to make the most of PowerPoint’s handout features.
What is a Handout in PowerPoint?
A handout in PowerPoint is a printed copy of your presentation slides, organized in a specific layout that allows multiple slides to be printed on one page. Handouts are typically used to provide your audience with a physical reference to your presentation, allowing them to follow along, take notes, or review the content later.
PowerPoint handouts can be customized to fit different needs, such as printing 2, 3, 6, or 9 slides per page. You can also include space for audience notes or add speaker notes next to each slide to enhance comprehension. Handouts are an effective way to reinforce your message during or after a presentation, offering a tangible resource for your audience to take away.
In addition to practical uses, handouts also help you save paper by condensing slides onto fewer pages. Furthermore, PowerPoint allows you to customize handouts with elements like your company logo, headers, footers, and page numbers, making them professional and branded.
What is Handout Master in PowerPoint?
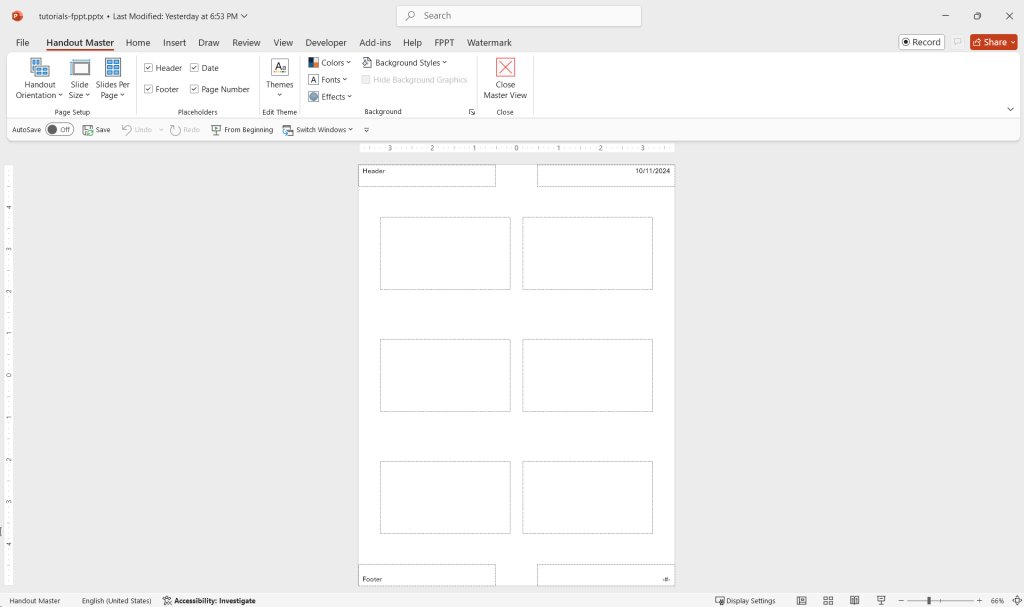
The Handout Master in PowerPoint is a feature that allows you to control and customize the layout and appearance of your printed handouts. It serves as a template for your handouts, giving you the ability to configure elements such as the number of slides per page, headers, footers, date, page numbers, and background style.

How to Create Handouts in PowerPoint Presentations
Slide handouts in PowerPoint is a printed version of your slides which can be printed in 2, 3, 6 or 9 slides per page. This is very handy if you need to carry with printed slides for reference or just to review something, verify and correct the slides, or give a copy to your audience at the same time that you save paper.

You can also customize the handouts with your company logo and it is possible to add the speaker notes to each printed slide, too.

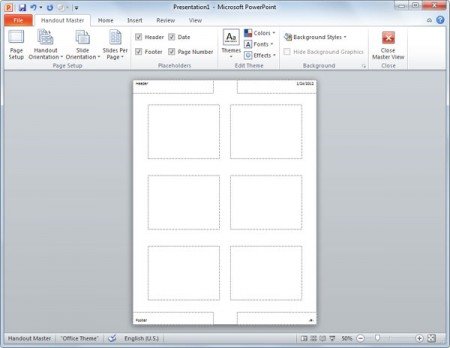
You can change the handout format accessing the handout formatting page that is like a Handout Template in PowerPoint. This template contains the formatting information that is applied to your presentation. To access this information you need to click on View -> Master -> Handout Master.
Here you can configure the background style for your handout, the header, footer, date, page number, and even the colors used to decorate your slides.
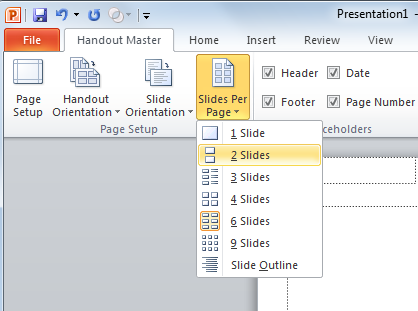
Also you can switch between 2, 3, 6, 9 slides per page. To achieve this change just click on the Slides Per Page button and you will see a new popup menu. Here you can also change to print the Outline instead of slides. This is very practical if you need to revise the tree structure of your presentation.

Slide orientation can also be changed with the previous button. This is very convenient if you want to change to portrait or landscape. Please notice that this is different than the Handout orientation, which define if you want to use the paper in portrait or landscape but not the slide. You can play with both, slides orientation and handout orientation to save space in your paper.
One way to make an effective presentation is creating a one page handout that summarizes your key points. You can use handouts for this purpose.
It is important to note that Handout Master elements are invisible until they are actually printed so you should print at least one to check the layout. When you print handout pages the slides will be formatted according to the Slide Master. If you want to try by your own you can download free PowerPoint templates and then try to create your own handout.
Real-Life Handout PowerPoint Examples
Here are 10 examples of handouts in PowerPoint with potential use cases and real-life applications:
- Business Meetings: In corporate meetings, print handouts with 3 slides per page. This allows attendees to follow along with the presentation while taking notes in the provided space. It’s especially useful when discussing financial data or project updates that require detailed attention.
- Client Presentations: When pitching to clients, handouts with 2 slides per page can provide a clear and professional summary of your key points. You can also customize these with your company logo and contact information for future reference.
- Workshops and Training Sessions: Handouts with 6 slides per page are often used in training workshops where trainees need a reference document that consolidates all the training content. This helps participants focus on hands-on activities while having a summary of the material at their fingertips.
- Educational Lectures: Teachers and professors can provide students with 3 or 6-slide handouts as study guides. These handouts give students a compact overview of the lecture content, making it easier to review the material before exams.
- Conferences and Seminars: At professional conferences, presenters often hand out printed versions of their slides with 2 or 3 slides per page to give attendees a takeaway that summarizes the talk. It’s particularly useful for highlighting key points and research findings.
- Sales Presentations: In sales pitches, providing handouts with 2 slides per page can help potential clients remember your product features and value proposition. These handouts can be left with clients for later review and decision-making.
- Training Manuals: Companies conducting internal training can use handouts to create a printed training manual, with 2 or 3 slides per page. This provides employees with a structured guide to follow along, especially during onboarding sessions.
- Strategic Planning Sessions: In board meetings or strategic planning workshops, printing handouts with an outline of the presentation (using the Outline View) can help attendees focus on the overall strategy without being bogged down by detailed slides.
- Workplace Safety Training: Safety officers can print handouts with important safety guidelines or emergency procedures. These handouts can include the most crucial slides that need to be remembered, such as safety protocols and contact numbers, organized in an easy-to-follow format.
- Product Demos: For technology companies or product teams, handouts summarizing the key functionalities and benefits of a new product, with space for audience notes, can be handed out during product demonstrations. This allows potential clients to engage with the presentation while having a useful takeaway for further consideration.
How to Print Handouts in PowerPoint?
Printing handouts in PowerPoint is a straightforward process that allows you to provide your audience with a physical copy of your slides. Here’s how to do it:
- Open your presentation: First, open the PowerPoint file for which you want to create handouts.
- Go to the Print menu: Click on File and select Print from the dropdown menu. This will open the printing options.
- Choose the handout layout: Under the Settings section, click the dropdown menu that shows “Full Page Slides.” In this menu, you’ll find the option to print Handouts. You can select how many slides per page (e.g., 2, 3, 6, or 9) depending on your preference. The 3-slides-per-page layout also includes lines for audience note-taking.
- Customize your print settings: You can further customize your handouts by adjusting options such as orientation (portrait or landscape), adding or removing speaker notes, and selecting color options (color, grayscale, or black and white).
- Check the preview: Review the print preview to ensure your handouts look the way you want.
- Print the handouts: Once you’re satisfied with the setup, click Print to generate the handouts.
With these simple steps, you can create and print customized handouts to support your presentation, ensuring your audience has an easy reference to follow along or review later.
Conclusion
Whether you’re aiming to save paper, offer a space for notes, or reinforce your key points, handouts in PowerPoint can be tailored to fit your specific needs through features like the Handout Master and various layout options. By following the steps outlined in this article, you can easily create, customize, and print professional handouts that will leave a lasting impression on your audience. Take advantage of these tools to enhance your presentations, ensuring your message is both memorable and accessible.
